

Introduction – why?

After a long hiatus I’m finally posting a new article on my blog, this time about a photographic technique I had heard about but never used before. Partly because of the cost and partly because of my lack of knowledge of the various options out there. But let’s start at the beginning: why? Well, I was feeling a bit “burnt out” for lack of a better expression. My daily walks with my OES(Old English Sheepdog) Noam led me on the same old paths around my town again and again. I had explored those paths photographically with everything from an 8mm ultrawide angle to a 420mm tele lens, from a 35mm Lensbaby tilt/shift to a 135mm 60’ies Sovjet lens with reversed front element. I had used every processing technique in the book as well as a few not in any book (mostly unsuccessful I might add) and felt there was not much more to explore.
IR photography – what?
So what is infrared photography? Most people may know it from the far-infrared used in forensic art research where it is used to reveal old layers of paint in priceless works of art. Or you may have seen home improvement usage where IR is used to detect heat leakage from homes and identify where extra insulation is required. Yet others will know it from its militarily use where it allows early identification and targeting of enemy vehicles or personnel.
But the kind of infrared photography I had seen over the years was near-infrared, the terminology did not make much sense to me. This is quite different and what I saw basically had two faces. One was the gritty black & white filmic images with threatening clouds and extreme contrast. The other an almost magical fairy-tale world of inverted colors, pink, yellow and more. Both of these forms had an abundance of image detail, sharpness some might say.
The infrared light spectrum I got interested in is “near-infrared”, or simply, “IR”. Near-infrared refers to the spectrum of light just beyond the range humans can detect with their eyesight. This light range is between 700 – 1200 nm (nanometers). Today’s common digital camera sensors are not able to detect infrared images due to the way they are designed. More about that later.
 Usage of IR photography dates back to the early part of the 20th century. In WWI, IR photography turned out to be great as images using the IR spectrum were not affected as much by atmospheric haze as normal photos. IR images also show huge differences between vegetation and buildings or vehicles whereas bodies of water (streams, lakes etc.) turn a very dark hue, almost pitch-black.
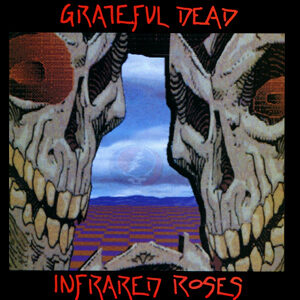
Later in the twentieth century, IR photography saw a different and more artful usage, as some of the musicians of the day, such as the Grateful Dead and Jimmy Hendrix, used it to produce psychedelic album covers.
Illustration Album Cover: Fair use, https://en.wikipedia.org/w/index.php?curid=4930279
Today, photography using reflected IR light produces somewhat surreal effects. Vegetation appears light (or even white). Skin takes on a very milky, smooth texture, although veins close to the skin surface can be accentuated and take on a rather ghoulish appearance. Eyes can appear a bit ghostly with the irises registering very dark tones and the whites of the eye taking on a grayish hue. Blue skies with fluffy clouds become much more dramatic. Contrast and image crispness (or even grittiness in some cases) are increased and the look and feel is something quite out of the ordinary.
A digital reflex camera and infrared photography – how?
Modern digital cameras have three things which hamper the capture of images with infrared light. The first is an IR cut-off filter over the sensor of the camera which filters out 95% of light not within the visible light spectrum – without this, normal photography capturing an image as the human eye sees the scene would be impossible. The second is that the light meter and exposure automation is calibrated, again, to those wavelengths which are visible to the naked eye – quite obvious as we don’t really “see” infrared as being bright. The last one is that infrared light has a very different diffraction and refractive index in the glass elements of the lens and impacts the autofocus sensor differently. Lenses become fuzzy and impossible to focus on a subject whether near or far and the AF of the camera locks on to the wrong focus point.
Disadvantages two and three, exposure variation and different focus characteristics can be dealt with in a variety of ways. Think of manual focus, focus via live view where the focus sensor is bypassed and only the sensor contrast is used to drive AF. Think also of exposure bracketing or manual exposure using the histogram on the LCD as a guide.
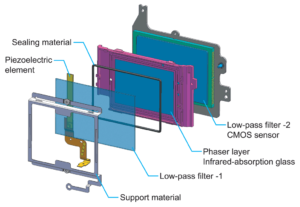
The first disadvantage can be dealt with in two ways. One is to use an infrared filter over the lens of a normal camera. Such a filter seems almost black as it blocks out all visible light and allows only IR through. But because the sensor is shielded against 95% of that very same IR light, a lot of it is needed to actually form an image. The result is extremely long exposures, sometimes running into multiple minutes, which require the use of a tripod and make photography of anything moving almost impossible.
The second way to deal with the disadvantage of the IR filter on the sensor is…to get rid of it entirely. That means disassembling the camera and removing the tiny sliver of glass over the sensor, replacing it either with entirely clear and transparent glass (a “wide spectrum” modification) which involves using lens filters to define what light will reach the sensor or putting in a piece of glass which filters out visible light and lets in infrared light in a defined wavelengths so any lens becomes an infrared lens without use of a lens filter. This is called a dedicated IR modification and choices are generally between filters in the 550 and 720 nanometer – each cutoff wavelength can result in a different effect on the image, 550nm resulting in extremely colorful results whereas 720 is used primarily for B&W images.
So the step between “just interested” and “let’s go” – when?
Well, I had been shooting digital reflex cameras since 2007 and upgraded as technology improved over time. One of the early camera bodies I had used was the Pentax K20D back in 2011. It had a whopping (!!!) megapixel count of 14.6 which was way over what I had used until that date – the 8mp Canon Powershot Pro1 non-interchangeable small sensor camera being about the highest to date. It was a solid camera which took me into the realm of architecture photography because of its wonderful detail sharpness and color rendition. However, its performance under bad lighting conditions was on par for the times (“on par” being more or less abysmal really) .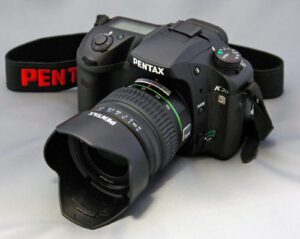
I remember that camera costing me a whopping €900 or so (without lens) and it was one of the camera bodies which fit my hand perfectly. I never purchased a camera with such a wonderful and solid form factor since. So when I came across a very lightly used K20D from a German eBay seller for all of €129 in May’22 I did not have to think for a long time. I got the camera which was in pristine condition and sent it off to have the infrared blocking filter taken out and replaced by a 630Nm cutoff filter.
Illustration K20D By ほしけん – Own work, CC BY 3.0, https://commons.wikimedia.org/w/index.php?curid=7515920